编写新的Costmap2D插件
概述
本教程展示了如何为Costmap2D创建自己的简单`插件 <http://wiki.ros.org/pluginlib>`_。
在开始教程之前,请查看此`视频<https://vimeo.com/106994708>`_,其中包含关于Costmap2D图层设计和插件基本操作原则的信息。
教程步骤
1-编写一个新的Costmap2D插件
作为演示,本示例将创建一个在costmap中放置重复的成本梯度的成本图插件。有关本教程的带注释代码可以在`navigation2_tutorials <https://github.com/ros-planning/navigation2_tutorials>`_存储库中找到,作为``nav2_gradient_costmap_plugin`` ROS 2软件包。在创建自己的Costmap2D层插件时,请参考它。
插件类``nav2_gradient_costmap_plugin::GradientLayer``继承自基类``nav2_costmap_2d::Layer``:
namespace nav2_gradient_costmap_plugin
{

class GradientLayer : public nav2_costmap_2d::Layer
基本类提供了一组虚拟方法的API,用于在插件中处理代价地图图层。这些方法在运行时由``LayeredCostmap``调用。下表列出了这些方法、它们的描述以及插件代码中必须具备这些方法的必要性:
虚拟方法 |
方法描述 |
需要重写? |
onInitialize() |
该方法在插件初始化结束时被调用。通常会在这里声明ROS参数。任何必要的初始化应该在这里进行。 |
No |
updateBounds() |
该方法用于询问插件:它需要更新哪个代价地图图层的区域。该方法有3个输入参数:机器人的位置和方向,以及4个输出参数:窗口边界的指针。出于性能考虑,这些边界用于更新窗口内的区域,其中有新信息可用,避免在每次迭代中更新整个代价地图。 |
是 |
updateCosts() |
每当需要重新计算代价地图时,将调用该方法。它仅在其边界窗口内更新代价地图图层。该方法有4个输入参数:计算窗口边界,以及1个输出参数:对结果代价地图``master_grid``的引用。 |
是 |
matchSize() |
每当地图尺寸发生变化时,将调用该方法。 |
No |
onFootprintChanged() |
每当足迹(footprint)发生变化时,将调用该方法。 |
No |
reset() |
在代价地图重置期间可以执行任何代码。 |
是 |
在我们的示例中,这些方法具有以下功能:
GradientLayer::onInitialize()包含了一个带有默认值的 ROS 参数的声明:
declareParameter("enabled", rclcpp::ParameterValue(true));
node_->get_parameter(name_ + "." + "enabled", enabled_);
并设置``need_recalculation_``边界重新计算指示器:
need_recalculation_ = false;
GradientLayer::updateBounds()如果need_recalculation_为true,则重新计算窗口边界,并且不论need_recalculation_的值如何,都会更新边界。GradientLayer::updateCosts()- 在这个方法中,梯度直接写入到结果代价地图``master_grid``,而不与之前的图层合并。这等同于使用内部``costmap_``并调用``updateWithTrueOverwrite()``方法。以下是主代价地图的梯度生成算法:
int gradient_index;
for (int j = min_j; j < max_j; j++) {
  // Reset gradient_index each time when reaching the end of re-calculated window
  // by OY axis.
  gradient_index = 0;
  for (int i = min_i; i < max_i; i++) {
    int index = master_grid.getIndex(i, j);
    // setting the gradient cost
    unsigned char cost = (LETHAL_OBSTACLE - gradient_index*GRADIENT_FACTOR)%255;
    if (gradient_index <= GRADIENT_SIZE) {
      gradient_index++;
    } else {
      gradient_index = 0;
    }
    master_array[index] = cost;
  }
}
其中,GRADIENT_SIZE 是地图单元中每个梯度周期的大小,GRADIENT_FACTOR 是每个步骤中代价地图值的递减量:
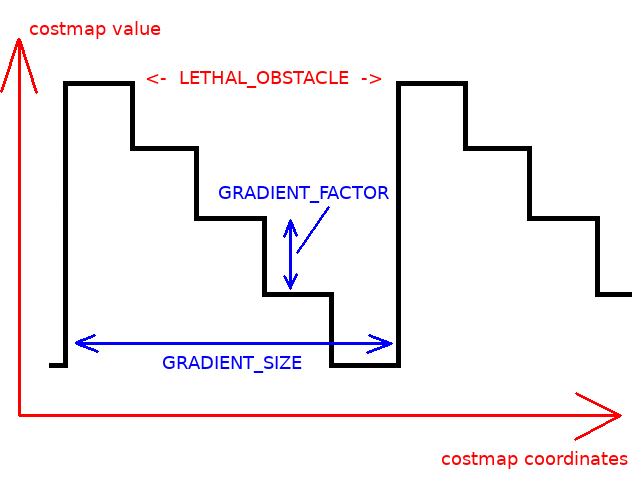
这些参数在插件的头文件中定义。
GradientLayer::onFootprintChanged()只是重置了need_recalculation_的值。GradientLayer::reset()方法是虚拟的:在此示例插件中未被使用。它保留在那里是因为父类Layer中的纯虚拟函数reset()要求被覆盖。
2- 导出并制作 GradientLayer 插件
编写的插件将在运行时作为其基本父类加载,然后由插件处理模块调用(对于 costmap2d 是由 LayeredCostmap 调用)。Pluginlib 在运行时打开给定的插件,并提供从导出类可调用的方法。类导出机制告诉 pluginlib 在这些调用期间应使用哪个基本类。这允许通过插件扩展应用程序,而无需知道应用程序源代码或重新编译它。
在我们的示例中,nav2_gradient_costmap_plugin::GradientLayer 插件的类应该作为 nav2_costmap_2d::Layer 基类进行动态加载。为此,插件应按以下方式注册:
插件的类应该使用加载类的基本类型进行注册。为此,应该将特殊宏
PLUGINLIB_EXPORT_CLASS添加到组成插件库的任何源文件中:
#include "pluginlib/class_list_macros.hpp"
PLUGINLIB_EXPORT_CLASS(nav2_gradient_costmap_plugin::GradientLayer, nav2_costmap_2d::Layer)
这部分通常放在插件类所在的 cpp 文件的末尾(在我们的示例中是 gradient_layer.cpp)。将这些行放在文件末尾是良好的做法,但从技术上讲,也可以放在文件顶部。
插件的信息应存储到插件描述文件中。这是通过在插件的软件包中使用单独的 XML(在我们的示例中为
gradient_plugins.xml)来完成的。该文件包含有关以下内容的信息:
path:插件所在库的路径和名称。
name: 在plugin_types参数中引用的插件类型(有关更多详细信息,请参见下一节)。它可以是任何你想要的。
type:插件类,其命名空间来自源代码。
basic_class_type: 插件类所派生的基本父类。
description:以文本形式的插件描述。
<library path="nav2_gradient_costmap_plugin_core">
  <class name="nav2_gradient_costmap_plugin/GradientLayer" type="nav2_gradient_costmap_plugin::GradientLayer" base_class_type="nav2_costmap_2d::Layer">
    <description>This is an example plugin which puts repeating costs gradients to costmap</description>
  </class>
</library>
通过将``pluginlib_export_plugin_description_file()`` cmake函数包含在``CMakeLists.txt``中来执行插件的导出。此函数将插件描述文件安装到``share``目录中,并为插件描述XML设置ament索引,以便可以将其发现为所选类型的插件:
pluginlib_export_plugin_description_file(nav2_costmap_2d gradient_layer.xml)
插件描述文件还应添加到 package.xml 中。costmap_2d 是接口定义的包,在我们的案例中为 Layer,需要提供指向 XML 文件的路径:
<export>
  <costmap_2d plugin="${prefix}/gradient_layer.xml" />
  ...
</export>
完成所有步骤后,将插件包放入特定ROS 2工作空间的``src``目录中,构建插件包(colcon build --packages-select nav2_gradient_costmap_plugin --symlink-install),并在必要时源化``setup.bash``文件。
现在插件已经准备好使用了。
3- 在Costmap2D中启用插件
下一步需要告知 Costmap2D 新插件的存在。为此,插件应可选地添加到 nav2_params.yaml 的 local_costmap/global_costmap 的 plugin_names 和 plugin_types 列表中,以便在 Controller/Planner 服务器的运行时启用。plugin_names 列表包含插件对象的名称,这些名称可以任意指定。plugin_types 包含在 plugin_names 中列出的对象的类型,这些类型应与插件描述 XML 文件中指定的插件类的 name 字段对应。
注解
对于Galactic或更新版本,plugin_names``和``plugin_types``已经被单个``plugins``字符串向量替代,用于插件名称。现在,类型在``plugin_name``命名空间中的``plugin:``字段中定义(例如:``plugin: MyPlugin::Plugin)。代码块中的内联注释将帮助指导您完成此操作。
例如:
--- a/nav2_bringup/bringup/params/nav2_params.yaml
+++ b/nav2_bringup/bringup/params/nav2_params.yaml
@@ -124,8 +124,8 @@ local_costmap:
       width: 3
       height: 3
       resolution: 0.05
-      plugins: ["obstacle_layer", "voxel_layer", "inflation_layer"]
+      plugins: ["obstacle_layer", "voxel_layer", "gradient_layer"]
       robot_radius: 0.22
       inflation_layer:
         cost_scaling_factor: 3.0
@@ -171,8 +171,8 @@ global_costmap:
       robot_base_frame: base_link
       global_frame: map
       use_sim_time: True
-      plugins: ["static_layer", "obstacle_layer", "voxel_layer", "inflation_layer"]
+      plugins: ["static_layer", "obstacle_layer", "voxel_layer", "gradient_layer"]
       robot_radius: 0.22
       resolution: 0.05
       obstacle_layer:
YAML文件还可以包含每个插件的参数列表(如果有)。这些参数由插件对象名称进行标识。
注意:一种类型的插件可能同时加载多个对象。因此,“plugin_names”列表应包含不同的插件名称,而“plugin_types”将保持相同的类型。例如:
plugins: ["obstacle_layer", "gradient_layer_1", "gradient_layer_2"]
在这种情况下,每个插件对象将在YAML文件中通过自己的参数树进行处理,例如:
gradient_layer_1:
  plugin: nav2_gradient_costmap_plugin/GradientLayer
  enabled: True
  ...
gradient_layer_2:
  plugin: nav2_gradient_costmap_plugin/GradientLayer
  enabled: False
  ...
4- 运行GradientLayer插件
使用启用了Nav2的Turtlebot3仿真运行。如何进行设置的详细说明请参阅:ref:getting_started。以下是快捷命令:
$ ros2 launch nav2_bringup tb3_simulation_launch.py
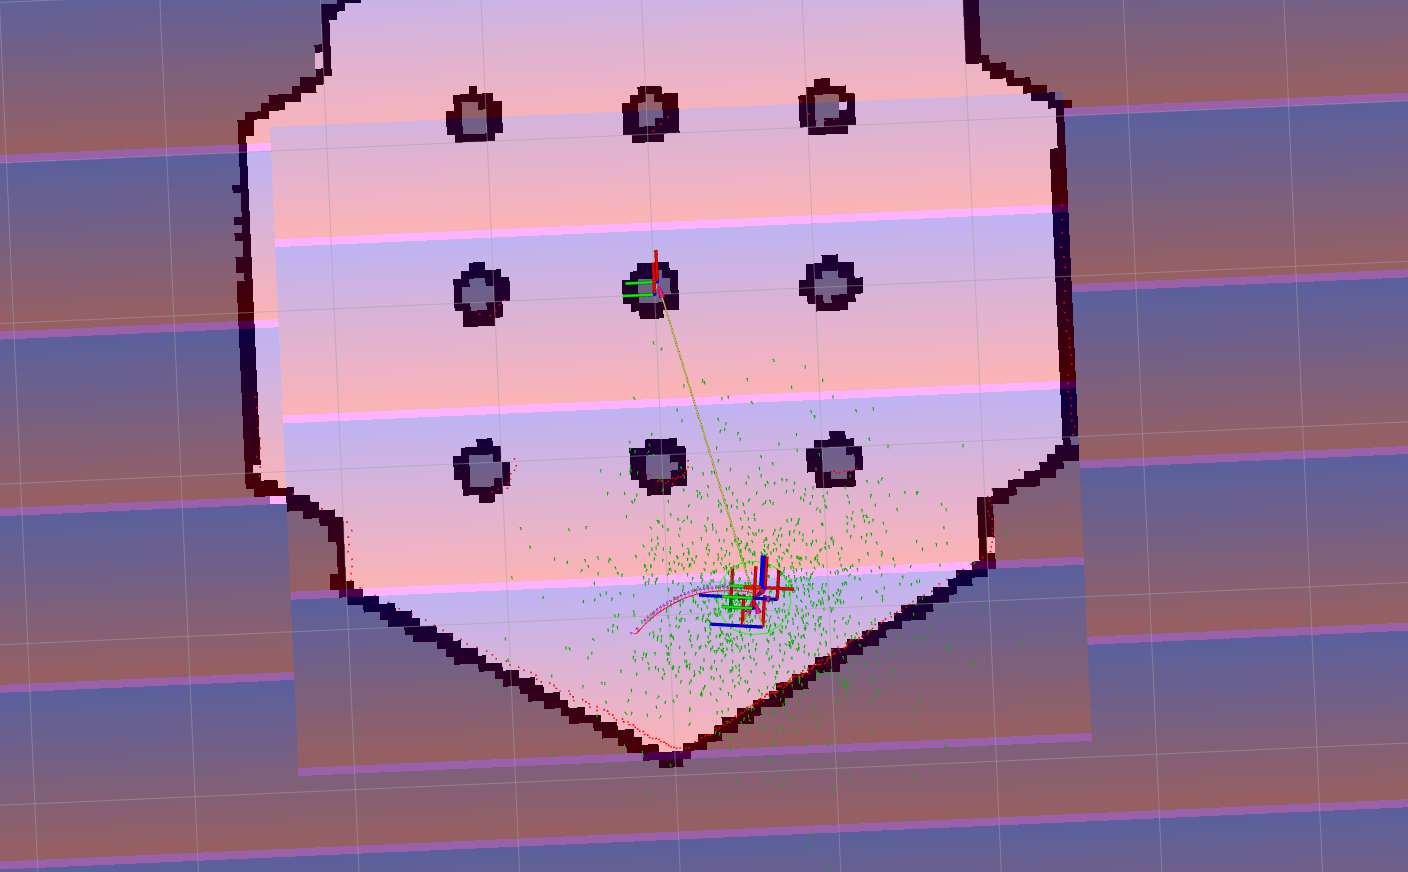
然后转到RViz,并单击顶部的“2D姿势估计”按钮,根据:ref:`getting_started`中所述,在地图上指向位置。机器人将在地图上进行定位,结果应如下图所示。在那里,可以看到梯度代价图。还有两个明显的特点:由``GradientLayer::updateCosts()``在其边界内动态更新的代价图和由梯度曲线化的全局路径: