使用禁止区域进行导航
概述
本教程演示了如何简单地利用无法进入的禁止/安全区域以及工业环境和仓库中移动的机器人的首选车道。所有这些功能都由“KeepoutFilter”代价地图过滤器插件提供,该插件将在本文档中启用并使用。
教程步骤
1. 准备过滤掩模
如在:ref:`概念`中所述,任何代价地图过滤器(包括Keepout过滤器)都会读取过滤掩码文件中标记的数据。过滤掩码是一个通常通过PGM、PNG或BMP栅格文件进行分发的Nav2 2D地图,其元数据包含在一个YAML文件中。以下步骤有助于理解如何制作新的过滤掩码:
创建一个新的图像,格式为PGM/PNG/BMP:从``Nav2``存储库中复制用于世界模拟中的主地图``turtlebot3_world.pgm``到新的``keepout_mask.pgm``文件中。
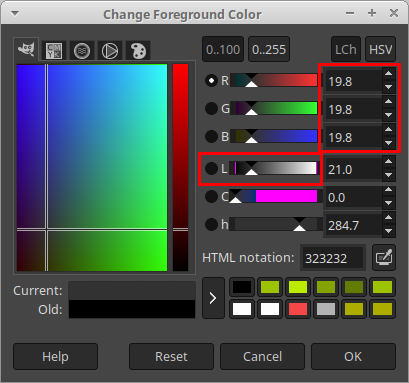
在您喜欢的栅格图形编辑器中打开“keepout_mask.pgm”(例如,可以使用GIMP编辑器作为示例)。掩码上每个像素的亮度代表您将要使用的特定代价地图过滤器的编码信息。每个像素的颜色亮度属于“[0..255]”范围(或者百分比刻度下的“[0..100]”),其中“0”表示黑色,而“255”表示白色。另一个术语“黑暗”将被理解为亮度的确切相反。换句话说,“颜色黑暗度 = 100% - 颜色亮度”。
在GIMP中,亮度通过颜色分量值(例如,百分比比例中的``R``)来表示,并可以通过移动颜色更改工具中的``L``滑块来设置:
地图服务器正在读取传入的掩码文件,并将其转换为来自“[0..100]”范围的“OccupancyGrid”值(其中“0”表示空闲单元格,“100”表示占用单元格,介于两者之间的任何值表示地图上更少或更多的占用单元格),或等于未知值的“-1”。在Nav2堆栈中,每个地图都具有“mode”属性,可以是“trinary”、“scale”或“raw”。根据所选的“mode”,PGM/PNG/BMP的颜色亮度将按照以下原则之一转换为“OccupancyGrid”:
trinary``(默认模式):暗度大于等于``occupied_thresh``表示地图被占用(``100)。暗度小于等于``free_thresh``表示地图为空闲(0)。两者之间的值表示地图上的未知状态(-1)。“scale”:Alpha < 1.0 - 未知。黑暗度 >= “occupied_thresh”表示地图已占用(“100”)。黑暗度 <= “free_thresh” - 地图为空闲(“0”)。介于两者之间 - 线性插值到“[0..100]”范围内最近的整数。
raw:亮度为``0``(暗色)表示地图为空闲(0)。亮度为``100``(绝对值)表示地图被占用(100)。两者之间的值表示``OccupancyGrid``的值等于亮度。亮度大于等于``101``表示未知(-1)。
其中“free_thresh”和“occupied_thresh”阈值以最大亮度/黑暗度级别(“255”)的百分比表示。地图模式和阈值放置在YAML元数据文件中(见下文),作为“mode”、“free_thresh”和“occupied_thresh”字段。
注解
在YAML元数据文件中还有另一个参数叫做``negate``。默认情况下,它被设置为``false``。当它被设置为``true``时,较黑的像素将被视为可通行的,较白的像素将被视为占用的。在这种情况下,对于``trinary``和``scale``模式,我们应该计算颜色的亮度而不是暗度。``negate``对``raw``模式没有影响。
对于Keepout过滤器,“OccupancyGrid”值与与此单元格对应的区域的可通行性成比例:较高的值表示不可通过的区域更多。具有占用值的单元格覆盖了机器人永远不会进入或通过的禁止区域。通过将“OccupancyGrid”设置为介于“[1-99]”之间的非占用值,Keepout过滤器也可以作为“加权区域层”。机器人被允许在这些区域中移动,但是它在那里的存在将是“不可取的”(值越高,规划器越早尝试将机器人移出该区域)。
Keepout Filter还涵盖了首选车道的情况,即机器人只能在预定义的车道和允许的区域内移动,例如在仓库中。要使用此功能,您需要准备一个掩膜图像,在该图像中车道和允许的区域将被标记为可通行的值,而所有其他区域将被占用。在``trinary``或``scale``模式下绘制掩膜的提示:通常,属于车道的像素数量远少于覆盖其他区域的像素。在这种情况下,最初可以使用黑色铅笔在白色背景上绘制所有车道数据,然后(在保存PGM之前)可以使用图像光栅编辑器中的“颜色反转”工具。
为简化起见,在示例中使用黑色填充区域(在``trinary``模式下表示占用地图)来标记为禁止区域:
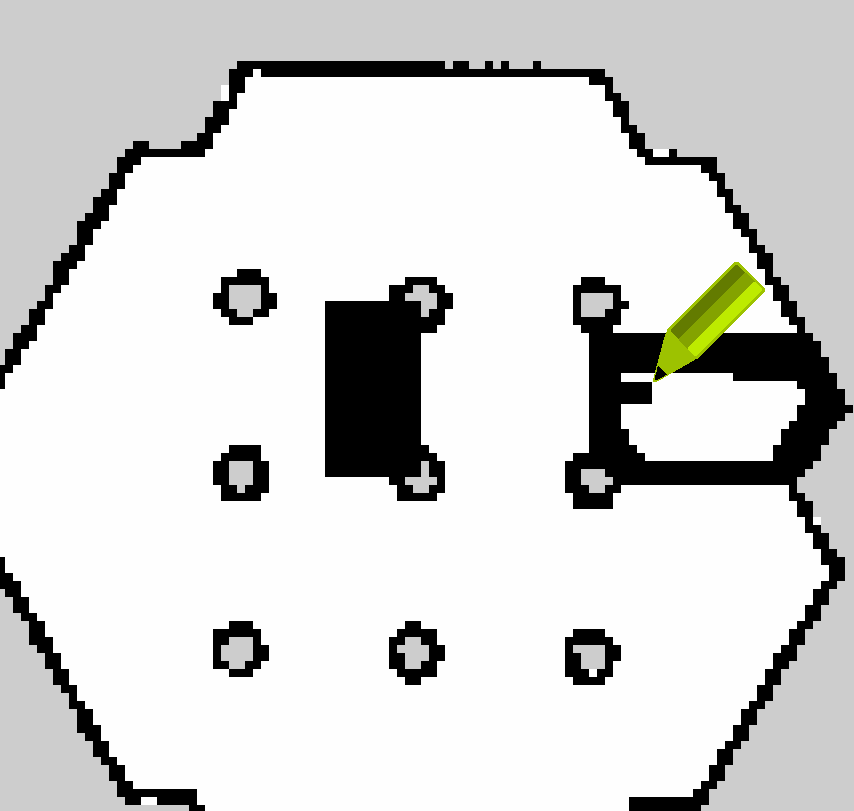
填充所有保留区域后保存``keepout_mask.pgm``图像。
与所有其他地图一样,过滤器掩码应具有自己的YAML元数据文件。将`turtlebot3_world.yaml <https://github.com/ros-planning/navigation2/blob/main/nav2_bringup/bringup/maps/turtlebot3_world.yaml>`_复制到``keepout_mask.yaml``中。打开``keepout_mask.yaml``并将``image``字段更正为新创建的PGM掩码:
image: turtlebot3_world.pgm
->
image: keepout_mask.pgm
由于过滤器掩膜图像是主地图的副本,因此不需要更改YAML文件的其他字段。保存``keepout_mask.yaml``,新的过滤器掩膜已准备好使用。
注解
世界地图本身和过滤器掩码可能具有不同的大小、原点和分辨率,这在以下情况下可能很有用:当过滤器掩码覆盖地图上较小区域时,或者当一个过滤器掩码重复多次使用时(例如,在酒店的相同形状房间中注释禁止区域)。对于这种情况,您还需要在YAML中正确设置``resolution``和``origin``字段,以便将过滤器掩码正确放置在原始地图上。
注解
另一个重要说明是,由于Costmap2D不支持方向性,origin``向量的最后一个``yaw``分量应该等于零。例如:``origin: [1.25, -5.18, 0.0]。
2. 配置成本地图过滤器信息发布服务器
每个costmap过滤器在``nav2_msgs/CostmapFilterInfo``类型的消息中读取传入的元信息(例如过滤器类型或数据转换系数)。这些消息由`Costmap Filter Info Publisher Server <https://github.com/ros-planning/navigation2/tree/main/nav2_map_server/src/costmap_filter_info>`_发布。服务器作为生命周期节点运行。根据`设计文档 <https://github.com/ros-planning/navigation2/blob/main/doc/design/CostmapFilters_design.pdf>`_,``nav2_msgs/CostmapFilterInfo``消息与``OccupancyGrid``过滤器掩膜主题成对出现。因此,在启用Costmap Filter Info Publisher Server的同时,应启用一个新的Map Server实例,并配置它来发布过滤器掩膜。
为了在配置中启用禁止区域过滤器,两个服务器都应作为Python启动文件中的生命周期节点启用。例如,可能如下所示:
import os

from ament_index_python.packages import get_package_share_directory

from launch import LaunchDescription
from launch.actions import DeclareLaunchArgument
from launch.substitutions import LaunchConfiguration
from launch_ros.actions import Node
from nav2_common.launch import RewrittenYaml


def generate_launch_description():
    # Get the launch directory
    costmap_filters_demo_dir = get_package_share_directory('nav2_costmap_filters_demo')

    # Create our own temporary YAML files that include substitutions
    lifecycle_nodes = ['filter_mask_server', 'costmap_filter_info_server']

    # Parameters
    namespace = LaunchConfiguration('namespace')
    use_sim_time = LaunchConfiguration('use_sim_time')
    autostart = LaunchConfiguration('autostart')
    params_file = LaunchConfiguration('params_file')
    mask_yaml_file = LaunchConfiguration('mask')

    # Declare the launch arguments
    declare_namespace_cmd = DeclareLaunchArgument(
        'namespace',
        default_value='',
        description='Top-level namespace')

    declare_use_sim_time_cmd = DeclareLaunchArgument(
        'use_sim_time',
        default_value='true',
        description='Use simulation (Gazebo) clock if true')

    declare_autostart_cmd = DeclareLaunchArgument(
        'autostart', default_value='true',
        description='Automatically startup the nav2 stack')

    declare_params_file_cmd = DeclareLaunchArgument(
            'params_file',
            default_value=os.path.join(costmap_filters_demo_dir, 'params', 'keepout_params.yaml'),
            description='Full path to the ROS 2 parameters file to use')

    declare_mask_yaml_file_cmd = DeclareLaunchArgument(
            'mask',
            default_value=os.path.join(costmap_filters_demo_dir, 'maps', 'keepout_mask.yaml'),
            description='Full path to filter mask yaml file to load')

    # Make re-written yaml
    param_substitutions = {
        'use_sim_time': use_sim_time,
        'yaml_filename': mask_yaml_file}

    configured_params = RewrittenYaml(
        source_file=params_file,
        root_key=namespace,
        param_rewrites=param_substitutions,
        convert_types=True)

    # Nodes launching commands
    start_lifecycle_manager_cmd = Node(
            package='nav2_lifecycle_manager',
            executable='lifecycle_manager',
            name='lifecycle_manager_costmap_filters',
            namespace=namespace,
            output='screen',
            emulate_tty=True,  # https://github.com/ros2/launch/issues/188
            parameters=[{'use_sim_time': use_sim_time},
                        {'autostart': autostart},
                        {'node_names': lifecycle_nodes}])

    start_map_server_cmd = Node(
            package='nav2_map_server',
            executable='map_server',
            name='filter_mask_server',
            namespace=namespace,
            output='screen',
            emulate_tty=True,  # https://github.com/ros2/launch/issues/188
            parameters=[configured_params])

    start_costmap_filter_info_server_cmd = Node(
            package='nav2_map_server',
            executable='costmap_filter_info_server',
            name='costmap_filter_info_server',
            namespace=namespace,
            output='screen',
            emulate_tty=True,  # https://github.com/ros2/launch/issues/188
            parameters=[configured_params])

    ld = LaunchDescription()

    ld.add_action(declare_namespace_cmd)
    ld.add_action(declare_use_sim_time_cmd)
    ld.add_action(declare_autostart_cmd)
    ld.add_action(declare_params_file_cmd)
    ld.add_action(declare_mask_yaml_file_cmd)

    ld.add_action(start_lifecycle_manager_cmd)
    ld.add_action(start_map_server_cmd)
    ld.add_action(start_costmap_filter_info_server_cmd)

    return ld
其中``params_file``变
costmap_filter_info_server:
  ros__parameters:
    use_sim_time: true
    type: 0
    filter_info_topic: "/costmap_filter_info"
    mask_topic: "/keepout_filter_mask"
    base: 0.0
    multiplier: 1.0
filter_mask_server:
  ros__parameters:
    use_sim_time: true
    frame_id: "map"
    topic_name: "/keepout_filter_mask"
    yaml_filename: "keepout_mask.yaml"
请注意:
对于Keepout过滤器,costmap过滤器的“type”应设置为“0”。
过滤器掩码主题名称应与成本地图过滤器信息发布服务器的``mask_topic``参数和地图服务器的``topic_name``参数相等。
根据Costmap过滤器的设计,OccupancyGrid的值在过滤器空间中被线性转换为特征图。对于Keepout过滤器,这些值直接作为过滤器空间的值传递,而不进行线性转换。即使在Keepout过滤器中未使用基础(base)和乘数(multiplier)系数,它们应分别设置为“0.0”和“1.0”,以明确表示我们从OccupancyGrid的值转换为过滤器值空间时是一对一的关系。
可在``navigation2_tutorials``存储库的``nav2_costmap_filters_demo``目录中找到完全可用的独立Python启动脚本、带有ROS参数和Keepout Filter示例的YAML文件。要简单运行Filter Info Publisher服务器和Map服务器以及在Turtlebot3标准仿真中进行调优,按照:ref:getting_started`中的说明构建演示并启动``costmap_filter_info.launch.py`:
$ mkdir -p ~/tutorials_ws/src
$ cd ~/tutorials_ws/src
$ git clone https://github.com/ros-planning/navigation2_tutorials.git
$ cd ~/tutorials_ws
$ colcon build --symlink-install --packages-select nav2_costmap_filters_demo
$ source ~/tutorials_ws/install/setup.bash
$ ros2 launch nav2_costmap_filters_demo costmap_filter_info.launch.py params_file:=src/navigation2_tutorials/nav2_costmap_filters_demo/params/keepout_params.yaml mask:=src/navigation2_tutorials/nav2_costmap_filters_demo/maps/keepout_mask.yaml
3. 启用Keepout过滤器
Costmap Filters是Costamp2D插件。您可以通过在``nav2_params.yaml``的``plugins``参数中添加``keepout_filter``来启用Costmap2D中的``KeepoutFilter``插件。您可以将其放置在``global_costmap``中以便进行带有禁区的规划,将其放置在``local_costmap``中以确保机器人不会试图穿越禁区。KeepoutFilter插件应定义以下参数:
“plugin”:插件的类型。在我们的例子中为“nav2_costmap_2d::KeepoutFilter”。
filter_info_topic:过滤器信息主题名称。这个参数需要与上面章节中的Costmap Filter Info Publisher Server的``filter_info_topic``参数相等。
“KeepoutFilter”支持的参数的完整列表请参考:ref:`keepout_filter`页面。
重要的是要注意,仅在``global_costmap``中启用``KeepoutFilter``将导致路径规划器在绕过禁区时建立计划。仅在``local_costmap``中启用``KeepoutFilter``将导致机器人不进入禁区,但路径仍然可能穿过禁区。因此,最佳做法是在``nav2_params.yaml``中同时将其添加到``global_costmap``和``local_costmap``中,以同时启用全局和局部costmap的``KeepoutFilter``。然而,并不总是必须如此。在某些情况下,全局costmap和局部costmap的禁区可能不同,例如,如果机器人不允许有意进入禁区,但如果在禁区内,机器人可以非常快速地进入和离开,只要它碰到一个边缘或角落。对于这种情况,不需要使用局部costmap副本的额外资源。
要为全局和局部costmap使用相同的掩码启用“KeepoutFilter”,请使用以下配置:
global_costmap:
  global_costmap:
    ros__parameters:
      ...
      plugins: ["static_layer", "obstacle_layer", "inflation_layer"]
      filters: ["keepout_filter"]
      ...
      keepout_filter:
        plugin: "nav2_costmap_2d::KeepoutFilter"
        enabled: True
        filter_info_topic: "/costmap_filter_info"
...
local_costmap:
  local_costmap:
    ros__parameters:
      ...
      plugins: ["voxel_layer", "inflation_layer"]
      filters: ["keepout_filter"]
      ...
      keepout_filter:
        plugin: "nav2_costmap_2d::KeepoutFilter"
        enabled: True
        filter_info_topic: "/costmap_filter_info"
注解
所有costmap过滤器都应通过``filters``参数启用-尽管在分层costmap中包含它们也是可行的。这是为了防止干扰层,尤其是膨胀层。

